October 3, 2019
xcparse
At WWDC 2019, Apple introduced Dark Mode, the most anticipated feature of their upcoming iOS 13 release. With this update, all compatible iOS devices will have a dynamic new look that can be configured via Settings or Control Center. ChargePoint has been working behind the scenes and is excited to bring Dark Mode to our iOS app on iOS 13 launch day.
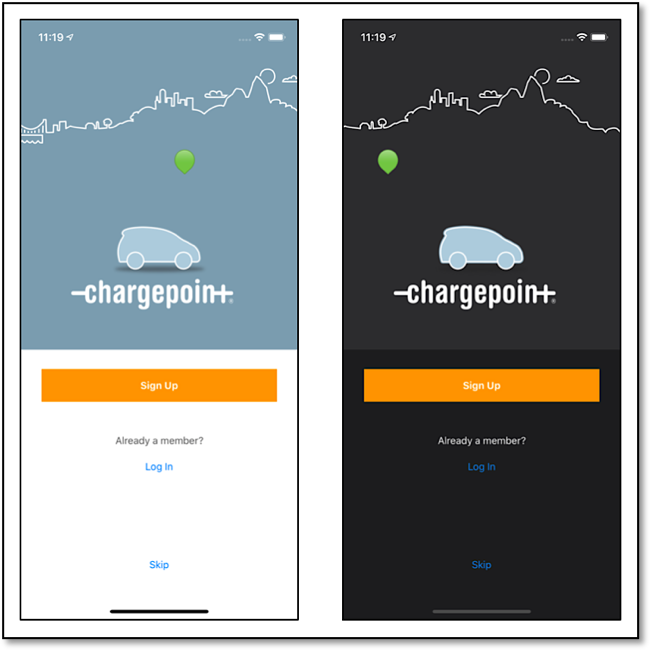
Features like Dark Mode in iOS 13 and Safe Area in iOS 11 present a unique challenge to mobile QA because, oftentimes, every screen and related script must be modified to support them. Manually verifying that every app screen supports these features without compromising on functionality is a tedious process. This is why we've written automated UI tests that capture screenshots of every view in our app.
Automated Testing Prior to Xcode 11
Automated UI tests are only useful if the screenshots generated are easy to navigate and view. When unit and UI tests are run within Xcode, Xcode test reports are saved within a generated result bundle. These result bundles are files with the extension ‘xcresult’ that contain information regarding Xcode builds, tests, code coverage, etc. Prior to Xcode 11, Apple’s Xcode result bundles were similar to Mac app bundles, using a directory structure that was easily navigable via Finder.
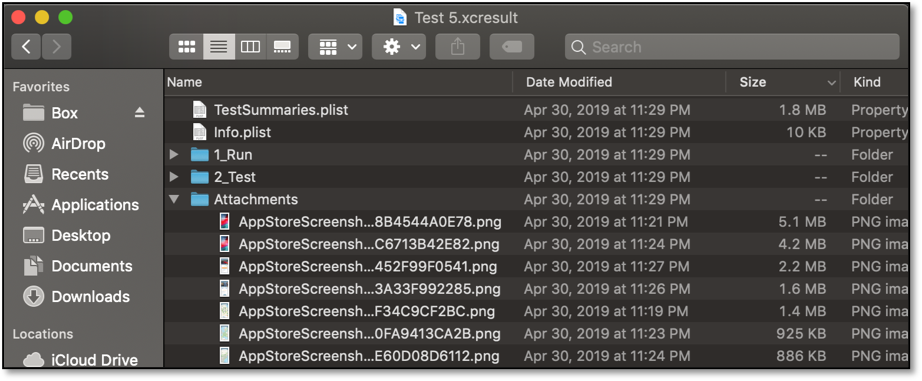
The format of these result bundles made it easy to write a simple bash script to extract all embedded screenshots. Here is a bash script to copy screenshots within our CI workflow on Bitrise.

Prior to Xcode 11 and iOS 13, we leveraged the result bundle and bash script to automate the generation of localized screenshots to be displayed in the App Store. Bitrise, a popular CI/CD service for mobile apps, has a Workflow Editor that allows developers to detail a number of steps, variables and configurations when running a specific build job. Leveraging Bitrise’s workflow functionality, we integrated our bash script and automated UI tests into a workflow that would reliably generate screenshots for the App Store. This is the Bitrise workflow to extract app screenshots.
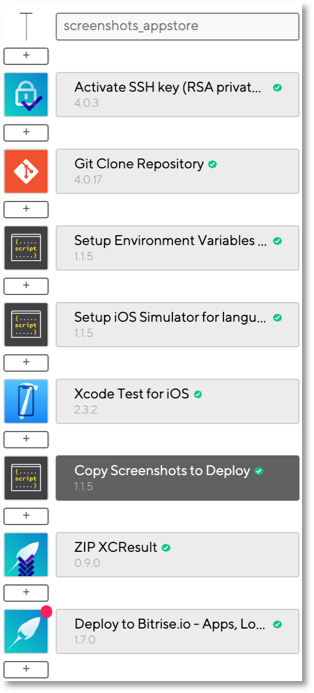
These app screenshots were directly viewable within Bitrise using our 'screenshots_appstore' workflow.

Xcode 11 Result Bundles and xresulttool
With the introduction of Dark Mode in iOS 13, we planned to write UI tests very similar to the automated tests we’d previously written to generate our App Store screenshots. However, all our iOS 13 development had to be done using Xcode 11, which introduced a massive change to the format of Xcode’s result bundles. When viewed in Finder, these new result bundles have a confusing file structure that doesn’t allow direct viewing of test attachments.
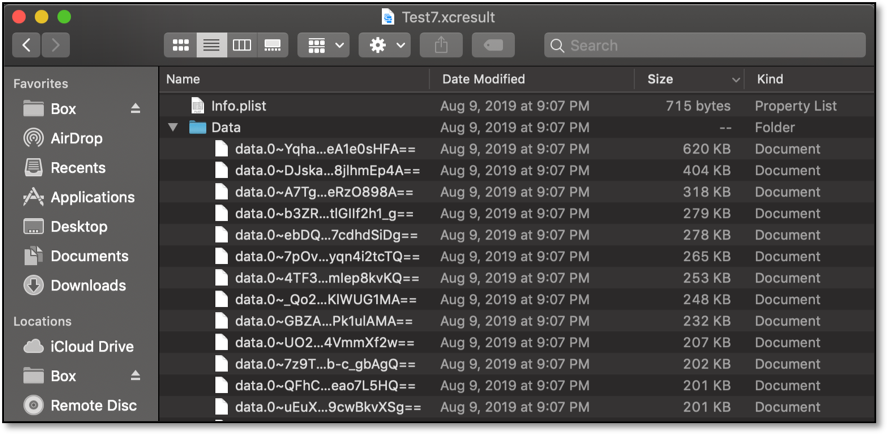
Xcode 11 does provide developers with the ability to view xcresult files through Xcode’s GUI. However, this feature comes with its own set of issues, as the Xcode GUI doesn’t provide the easiest means for navigating screenshots within test reports. Here is a nested test report within Xcode 11.
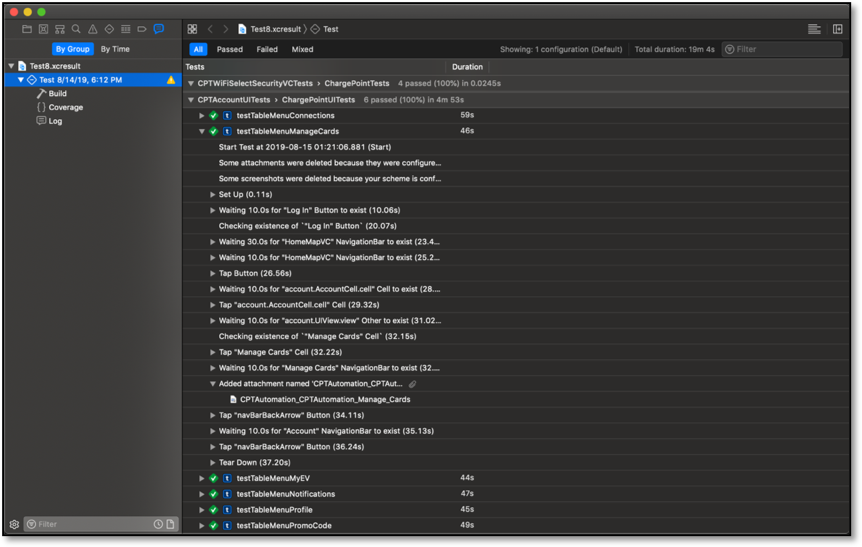
For the QA team to verify changes made using the automated test screenshots, they would have to navigate the complex, nested structure of the Xcode 11 test report and open a single screenshot at a time.
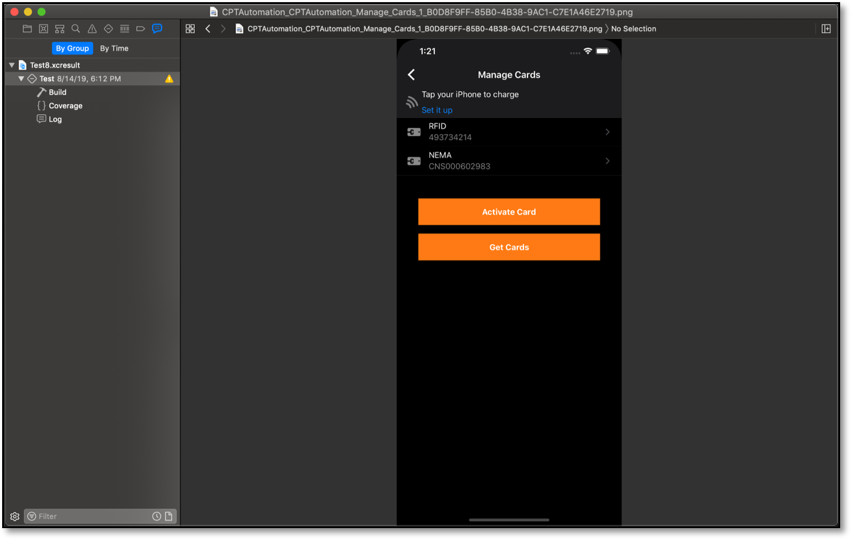
To circumvent this tedious process, we looked to ‘xcresulttool’, a command-line tool provided by Apple to inspect Xcode 11 result bundles. This tool gives developers complete access to the models contained within a given result bundle. The contained data is obtained in a publicly documented JSON format that can be parsed to extract build failures, test attachments, code coverage and more. The xcresulttool can be used to obtain the schema of the generated JSON file.


The xcresulttool can be used to drill down into a given xcresult file until a raw file can be found and exported. However, writing a bash script to extract screenshots or code coverage proved to be a complex process. The steps listed below detail the process required to extract a single file from a given xcresult file.
Running this command returns a JSON representation of the given xresult file.


The xresult JSON contains an "id" field with reference to test summaries.

Running this command returns a JSON representation of a specific test plan run summary.


These test summaries contain "id" fields within nested subtest objects that refer to subtest summaries.

Running this command returns a JSON representation of a subtest summary.


Each subtest summary JSON contains 'attachments' objects with filenames and "id" fields with references to the raw files.

Finally, running this command extracts the file (screenshot, in this case) referenced by the "id" field.


Given the nested nature of the xcresult JSON representation, these steps may vary based on the kind of file (log file, code coverage, screenshot, etc.) being extracted and the level of nesting due to number of tests, test plans and test configurations run. A bash script could get onerous dealing with the complex and dynamic nature of Xcode’s new result bundles. We needed an intelligent solution that could deal with the issue at hand with a thorough understanding of the nested models to be parsed—so we wrote ‘xcparse’.
xcparse: Extracting Screenshots and Code Coverage from Xcode 11 Result Bundles
'xcparse' is an open-source command-line tool written in Swift 5 that can be used to extract screenshots and code coverage from a given Xcode 11 xcresult file. It can be installed via Homebrew, the most widely used package management system used to install software on macOS. To install xcparse, simply run:

This command taps into our xcparse homebrew tap and installes xcparse locally.

How to Use xcparse

It takes a single command to extract all the screenshots or the code coverage file from a given result bundle using xcparse.

Running the above command extracts all the screenshots in an xcresult file and exports them to a chosen destination.

The same command when run with the ‘-x’ option will extract code coverage from the given xcresult file.
How xcparse Works: Swift Codable Parsing
The xcparse tool accepts the path to an xcresult file as well as a specified destination folder. The first thing xcparse does is leverage the xcresulttool to obtain the JSON representation of the given result bundle. This is the data that xcparse acts on.
Considering that every result bundle’s JSON representation is slightly different, xcparse needed to be able to parse the JSON files by their contained objects and attributes. As mentioned earlier, running the command 'xcrun xcresulttool formatDescription' displays all the possible object types contained within the Xcode result bundle format, along with their types, supertypes and properties.
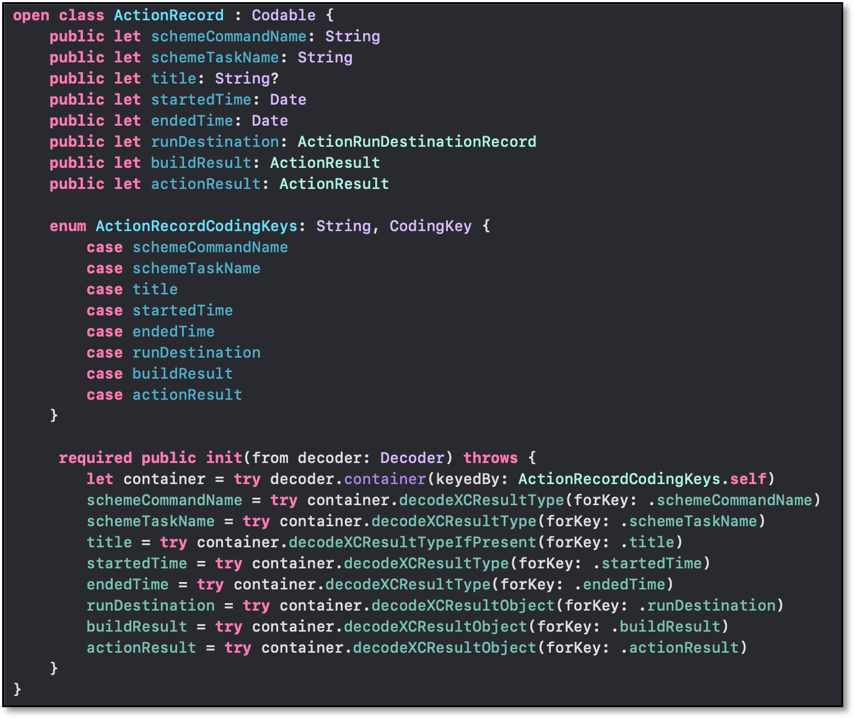
We created an XCParseCore framework that contained each of these objects as custom data types. Each of these data types was specified to be Swift Codable to ensure they were compatible with the JSON files we were parsing. Here is an example of a custom Swift Codable data type that can be decoded from a given JSON.
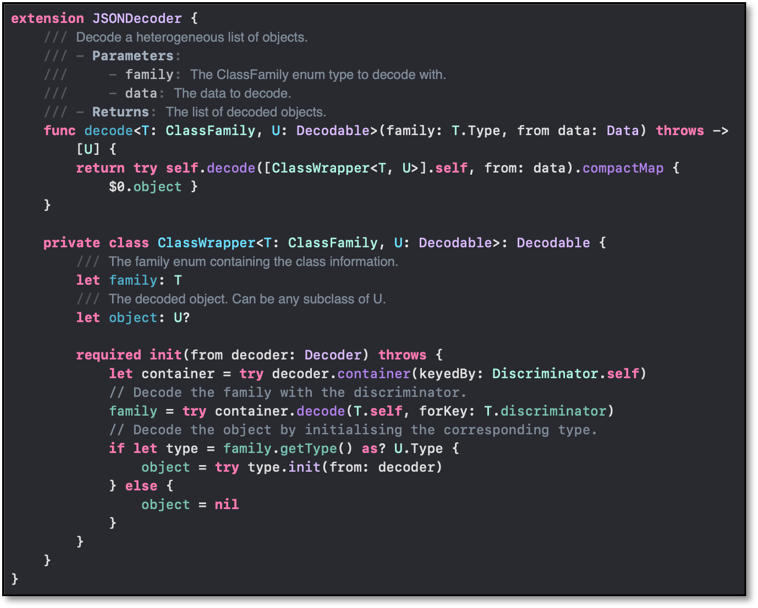
We also extended the JSONDecoder class to use a class wrapper to determine which of these custom types we would like to parse. Setting this up allowed us to decode any JSON representation of an xcresult file into one of our custom objects.
Once we obtained the object representation of a result bundle, it was only a matter of navigating the object’s nested properties to search for “id” fields as required. After obtaining all the relevant IDs in a single JSON, xcparse leverages Apple’s xcresulttool to either export files to a specified destination folder or create a new JSON that it would continue parsing. Here is an example of an "id" field that would be referenced to obtain a JSON representation of test summaries to continue parsing.

Each subsequent JSON is decoded into one of our custom objects in a similar process until xcparse drills down to the raw file to be extracted and saved. Thus, xcparse utilizes Apple’s xcresulttool, along with our XCParseCore framework, to solve the issue of extracting files from Xcode 11’s new result bundle format.
Integration of xcparse with Bitrise CI
With xcparse built, the next step was to integrate it with our CI/CD pipeline to completely automate the process of extracting screenshots. The new Bitrise workflow was very similar to what we had in place prior to Xcode 11.
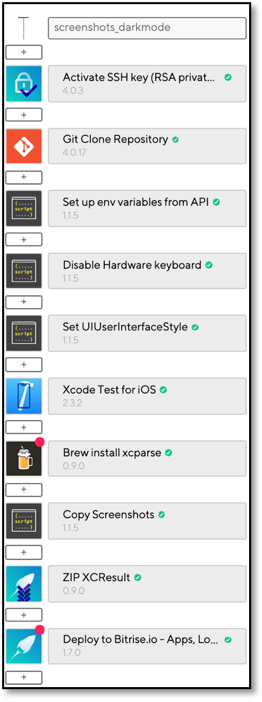
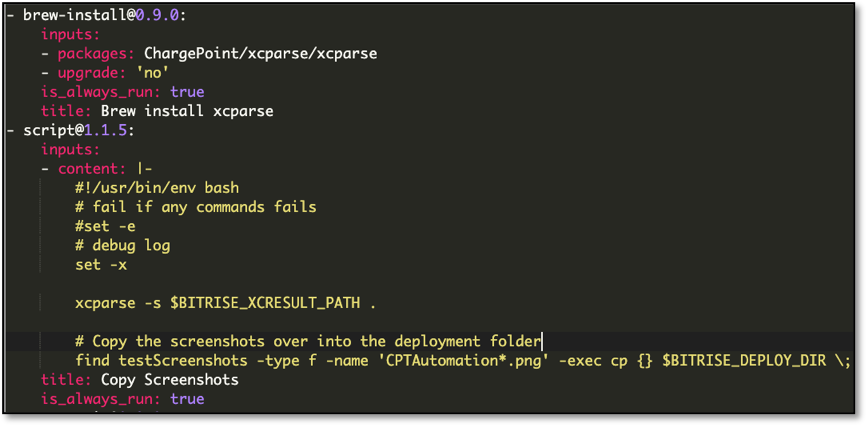
The only changes introduced were the additional step to install xcparse via Homebrew and the usage of xcparse to extract screenshots in place of our earlier bash script. Here is the Bitrise.yml snippet with steps for installation of xcparse and subsequent screenshot extraction.
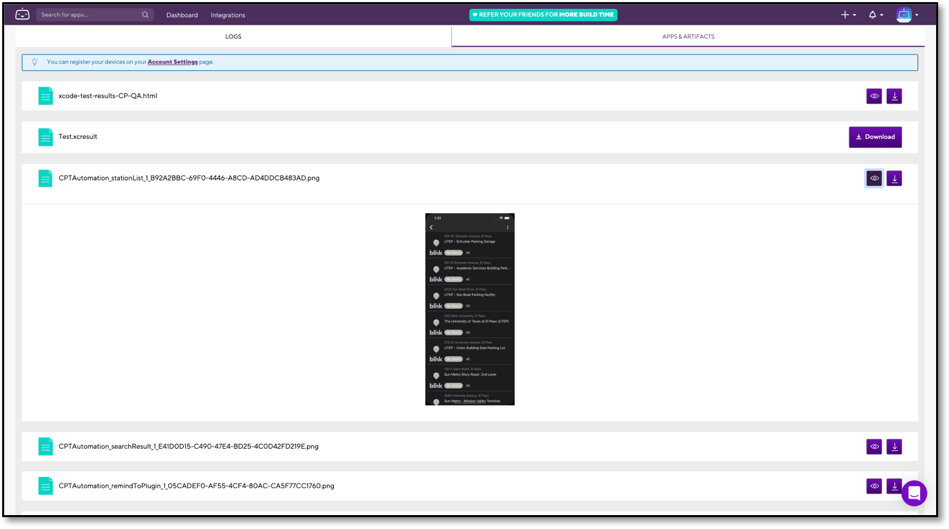
With this setup, we were able to integrate xcparse with our Bitrise workflows to make all our UI test screenshots immediately viewable within a successful build. See how Dark Mode screenshots are directly viewable within Bitrise using our 'screenshots_darkmode' workflow—identical to our setup for app store screenshots prior to Xcode 11.
Swift Package Manager
To allow developers to extend the functionality of our xcresult parsing framework or use within their own Swift tools, we set up xcparse as a Swift Package. Any Xcode developer can simply add xcparse as a package dependency to their working project and utilize our parsing framework to solve related problems. Simply navigate to File > Swift Packages > Add Package Dependency.
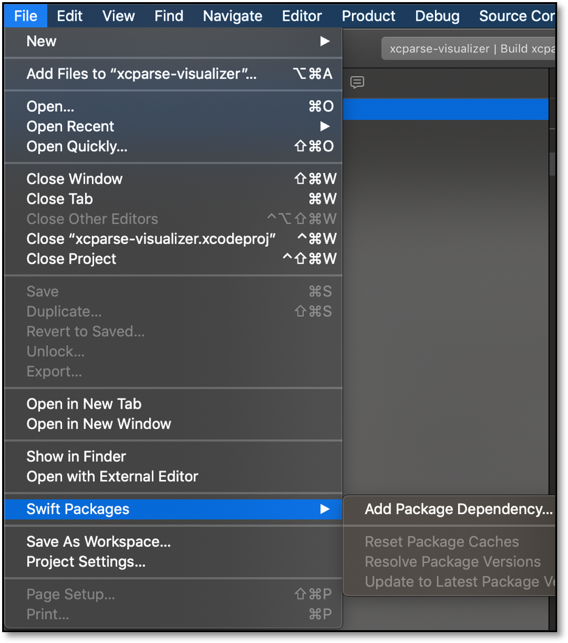
Then, enter the xcparse Github repository URL to add to package dependency.

Once the package dependency has been added, you will see the xcparse source files in your Project Navigator.

Next Step for Developers: xcparse-visualizer
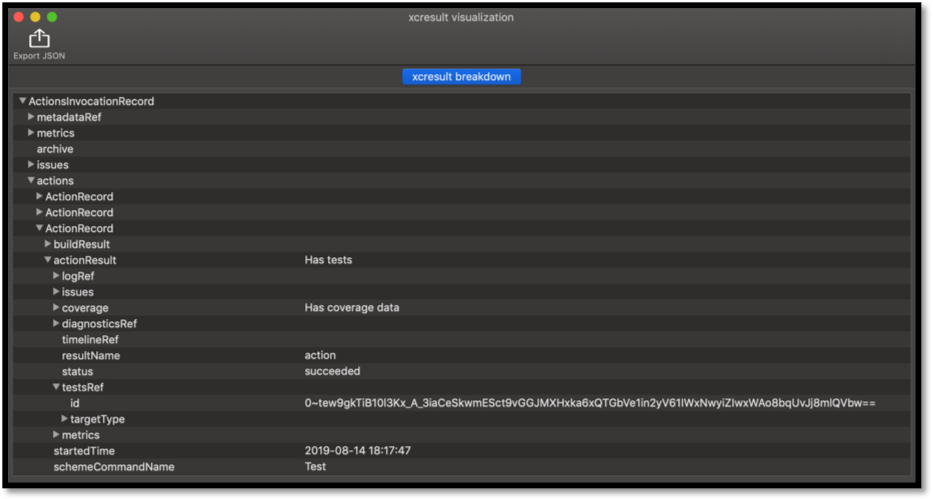
As we worked on xcparse and began integrating it with our CI/CD pipeline, we realized some developers might want to see what was happening under the hood. Thus, we wanted to create an application that would allow users to visualize all the models contained within a given result bundle. We built this app and dubbed it the xcparse-visualizer. Unlike opening an xcresult file with Xcode, this app displays every object with its type and nested properties in an outline view. In addition to visualizing the result bundle’s contained models, the app allows you to export contained files to a chosen destination or open the visualization of a subsequent JSON in a new tab. The xcparse-visualizer is now a part of our xcparse Swift package and is free for developers to use.
How Can You Contribute?
As mentioned earlier, xcparse is open source and we welcome developers to build on what we have created! You can contribute to xcparse by simply forking the xcparse repository, making your desired changes and submitting a pull request to be merged on review.

With the creation of xcparse, ChargePoint’s mobile engineering team set out to demystify Apple’s new Xcode result bundle format. However, the job is never completely finished. We encourage all developers to contribute to xcparse and extend its functionality to satisfy their needs. This will only make xcparse more powerful and useful to more people. We also encourage developers using and contributing to xcparse to use the xcparse-visualizer to gain a better understanding of the xcresult format. The next time you find yourself working with automation tests in Xcode or encounter a new problem that requires an understanding of Xcode’s new result bundle, remember to turn to xcparse as your one stop shop for xcresult parsing solutions.
If you think you have what it takes to work with a brilliant team of freethinkers to reinvent mobility, check out our opportunities.
The information contained herein is considered proprietary and for informational purposes only and is not to be used or replicated in any way without the prior written authorization of ChargePoint, Inc.
